- Empty cart.
- Continue Shopping
Need help? Contact Us.
EGP410.00
The Uno R3 operates at 5V which can be supplied via an external power supply or through the USB port connection. The power source is selected automatically if both are available. If an external supply is used, it is recommended to use a supply between 7-12V. Higher input voltages will cause the on-board regulator to work harder and may cause it to overheat.
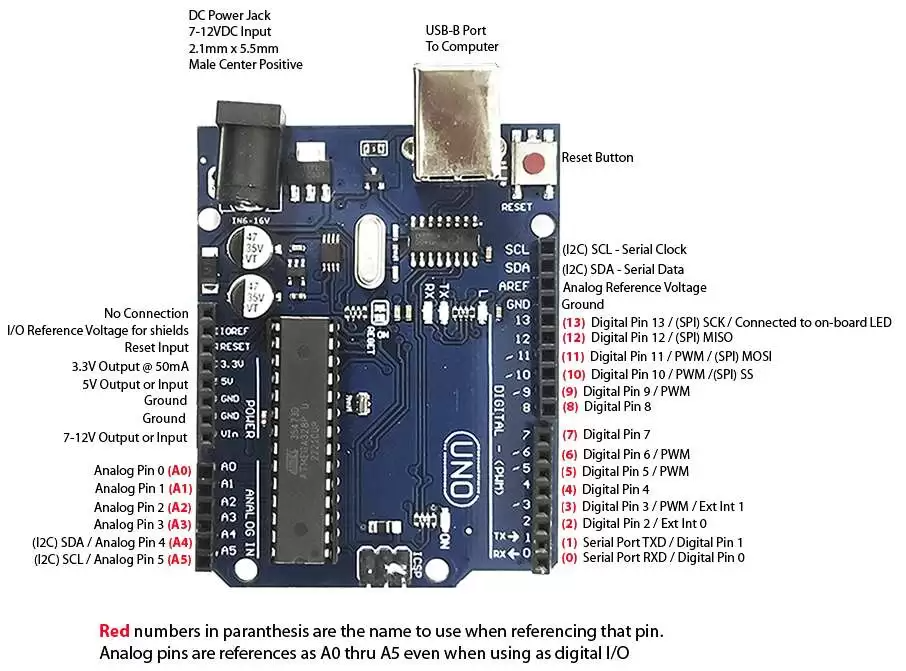
The attached board pin-out shows the most commonly used functions for the pins, but some pins can support other functions. Refer the the Arduino documentation for all possible functions for the pins.
This is Uno design which uses a DIP processor placed in a socket. The benefit to this design is that it is easy to replace the processor should the chip become damaged, but it does cost more than the SMD version that we also sell.
The board uses the CH340 chip for USB communications. If you have any issues with connecting to the board, you may need to download a driver. Just search for Arduino CH340 driver and you will find a number of sources for drivers depending on what Windows or Mac operating system you are using.
| Microcontroller | ATmega328P |
| Serial to USB Converter | CH340 |
| Operating Voltage | 5V |
| Input Voltage | 7-12V |
| Digital I/O Pins | 14 |
| PWM I/O Pins (Shared with Digital I/O) | 6 |
| Analog Input Pins | 6 |
| DC Current per I/O Pin | 20mA |
| DC Current which can be drawn from 3.3V Pin | 50mA |
| Flash Memory | 32 KBytes |
| SRAM | 2 KBytes |
| EEPROM | 1 KBytes |
| Clock Speed | 16MHz |
| Built-in LED | Attached to digital I/O Pin 13 |
| USB Connector Style | B-Type Female |
| Board Dimensions (PCB) | 68.8 x 53.4mm (2.7 x 2.1″) |
| Board Dimensions (with connector overhang) | 77 x 53.4mm (3 x 2.1″) |
| Mfr | China |

we’ll show you how to install CH340 drivers on multiple operating systems if you need them. The driver should automatically install on most operating systems. However, there is a wide range of operating systems out there. You may need to install drivers the first time you connect the chip to your computer’s USB port or when there are operating system updates.
